Thursday, September 15, 2016

Getting Caffe running on windows with MSVC2015 and CUDA 8.0

I've received some interest recently by people trying to get my branch of caffe running on Windows, so I thought I would put together a post regarding getting it up and running.
This will likely be a multipart post going over everything required to get caffe running on Windows with python bindings for use in ipython notebooks and jupyter.

Preliminaries

Build environment:
Windows 10 x64
MSVC 2015 Community. Update 0 <- This is important, cuda doesn't work against MSVC 2015 2 and greater.

I will be installing all libraries to: G:/libs
I will be building source code in: G:/code
I use tortoiseGit for my git ui.

I will be building against the following libraries:
Python 3.5
 - Installed to C:/python35
Boost 1.61 (Compiled from source against Python 3.5)
 - Installed to G:/libs/boost_1_61_0
OpenCV 3.1 from git
 - Installed to G:/libs/opencv
CUDA 8.0
 - Installed to default program files location
Other dependencies
 - Cloned to G:/libs/caffe_deps

Optional:
Qt 5.7
 - Installed to C:/qt/5.7/msvc2015_64
VTK 7.1
 - Installed to G:/libs/vtk
GStreamer 1.8.2 (1.9.2 has a linking bug that you wont run into until linking OpenCV)
 - Installed to G:/libs/gstreamer

Python 3.5
Python was installed from binary

Boost
Boost was compiled from source, it automatically picked up the python libraries and includes, however if it does not automatically pick up python, you can manually set the following settings in your project-config.jam file.
using python
     : # version
     : c:/Python35 # cmd-or-prefix
     : C:/Python35/include
     : C:/python35/libs/python35.lib
     ;

If you download the binary distribution, boost will be compiled against Python 2.7.
Boost from source: BOOST_LIBRARYDIR=G:/libs/boost_1_61_0/stage/lib
Boost from binary: BOOST_LIBRARYDIR=G:/libs/boost_1_61_0/lib64-msvc-14.0

OpenCV
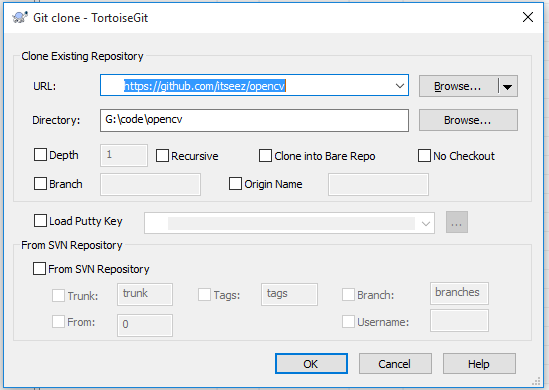
Right click the code folder and click clone.

Enter the url for OpenCV's repository, then click OK.  This will checkout the master branch from OpenCV's git.


Thrust bug fix in CUDA 8.0 RC
Thrust has a bug that prevents OpenCV from compiling correctly, the fix is to checkout the newest thrust from git and overwrite the one installed with CUDA 8.0.
Following the same procedure, clone http://github.com/thrust/thrust
Inside the newly created thrust folder "G:/code/thrust" for me, copy the thrust (G:/code/thrust/thrust) folder into C:\Program Files\NVIDIA GPU Computing Toolkit\CUDA\v8.0\include, overwriting the one that currently exists in that folder.  The include files should match up such that you're overwriting mostly the same files.


OpenCV CMake settings:
General configuration for OpenCV 3.1.0-dev =====================================
Version control: 2.4.9-10234-gc3b8b36-dirty

Platform:
Timestamp: 2016-09-16T02:12:34Z
Host: Windows 10.0.10240 AMD64
CMake: 3.5.0-rc1
CMake generator: Visual Studio 14 2015 Win64
CMake build tool: C:/Program Files (x86)/MSBuild/14.0/bin/MSBuild.exe
MSVC: 1900

C/C++:
Built as dynamic libs?: YES
C++ Compiler: C:/Program Files (x86)/Microsoft Visual Studio 14.0/VC/bin/x86_amd64/cl.exe (ver 19.0.23026.0)
C++ flags (Release): /DWIN32 /D_WINDOWS /W4 /GR /EHa /D _CRT_SECURE_NO_DEPRECATE /D _CRT_NONSTDC_NO_DEPRECATE /D _SCL_SECURE_NO_WARNINGS /Gy /bigobj /Oi /wd4251 /wd4324 /wd4275 /wd4589 /MP24 /openmp /MD /O2 /Ob2 /D NDEBUG /Oy- /Zi
C++ flags (Debug): /DWIN32 /D_WINDOWS /W4 /GR /EHa /D _CRT_SECURE_NO_DEPRECATE /D _CRT_NONSTDC_NO_DEPRECATE /D _SCL_SECURE_NO_WARNINGS /Gy /bigobj /Oi /wd4251 /wd4324 /wd4275 /wd4589 /MP24 /openmp /D_DEBUG /MDd /Zi /Ob0 /Od /RTC1
C Compiler: C:/Program Files (x86)/Microsoft Visual Studio 14.0/VC/bin/x86_amd64/cl.exe
C flags (Release): /DWIN32 /D_WINDOWS /W3 /D _CRT_SECURE_NO_DEPRECATE /D _CRT_NONSTDC_NO_DEPRECATE /D _SCL_SECURE_NO_WARNINGS /Gy /bigobj /Oi /MP24 /openmp /MD /O2 /Ob2 /D NDEBUG /Zi
C flags (Debug): /DWIN32 /D_WINDOWS /W3 /D _CRT_SECURE_NO_DEPRECATE /D _CRT_NONSTDC_NO_DEPRECATE /D _SCL_SECURE_NO_WARNINGS /Gy /bigobj /Oi /MP24 /openmp /D_DEBUG /MDd /Zi /Ob0 /Od /RTC1
Linker flags (Release): /machine:x64 /INCREMENTAL:NO /debug
Linker flags (Debug): /machine:x64 /debug /INCREMENTAL
Precompiled headers: YES
Extra dependencies: comctl32 gdi32 ole32 setupapi ws2_32 Qt5::Core Qt5::Gui Qt5::Widgets Qt5::Test Qt5::Concurrent Qt5::OpenGL vfw32 G:/libs/gstreamer/1.0/x86_64/lib/gstaudio-1.0.lib G:/libs/gstreamer/1.0/x86_64/lib/gstbase-1.0.lib G:/libs/gstreamer/1.0/x86_64/lib/gstcontroller-1.0.lib G:/libs/gstreamer/1.0/x86_64/lib/gstnet-1.0.lib G:/libs/gstreamer/1.0/x86_64/lib/gstpbutils-1.0.lib G:/libs/gstreamer/1.0/x86_64/lib/gstreamer-1.0.lib G:/libs/gstreamer/1.0/x86_64/lib/gstriff-1.0.lib G:/libs/gstreamer/1.0/x86_64/lib/gstrtp-1.0.lib G:/libs/gstreamer/1.0/x86_64/lib/gstrtsp-1.0.lib G:/libs/gstreamer/1.0/x86_64/lib/gstsdp-1.0.lib G:/libs/gstreamer/1.0/x86_64/lib/gsttag-1.0.lib G:/libs/gstreamer/1.0/x86_64/lib/gstvideo-1.0.lib G:/libs/gstreamer/1.0/x86_64/lib/glib-2.0.lib G:/libs/gstreamer/1.0/x86_64/lib/gstapp-1.0.lib G:/libs/gstreamer/1.0/x86_64/lib/gobject-2.0.lib vtkRenderingOpenGL vtkImagingHybrid vtkIOImage vtkCommonDataModel vtkCommonMath vtkCommonCore vtksys vtkCommonMisc vtkCommonSystem vtkCommonTransforms vtkCommonExecutionModel vtkDICOMParser vtkIOCore vtkzlib vtkmetaio vtkjpeg vtkpng vtktiff vtkImagingCore vtkRenderingCore vtkCommonColor vtkFiltersGeometry vtkFiltersCore vtkFiltersSources vtkCommonComputationalGeometry vtkFiltersGeneral vtkInteractionStyle vtkFiltersExtraction vtkFiltersStatistics vtkImagingFourier vtkalglib vtkRenderingLOD vtkFiltersModeling vtkIOPLY vtkIOGeometry vtkFiltersTexture vtkRenderingFreeType vtkfreetype vtkIOExport vtkRenderingGL2PS vtkRenderingContextOpenGL vtkRenderingContext2D vtkgl2ps glu32 opengl32 cudart nppc nppi npps cublas cufft -LIBPATH:C:/Program Files/NVIDIA GPU Computing Toolkit/CUDA/v8.0/lib/x64
3rdparty dependencies: zlib libjpeg libwebp libpng libtiff libjasper IlmImf

OpenCV modules:
To be built: cudev core cudaarithm flann imgproc ml video viz cudabgsegm cudafilters cudaimgproc cudawarping imgcodecs photo shape videoio cudacodec highgui objdetect ts features2d calib3d cudafeatures2d cudalegacy cudaobjdetect cudaoptflow cudastereo stitching superres videostab
Disabled: world
Disabled by dependency: -
Unavailable: java python2 python3

Windows RT support: NO

GUI:
QT 5.x: YES (ver 5.7.0)
QT OpenGL support: YES (Qt5::OpenGL 5.7.0)
OpenGL support: YES (glu32 opengl32)
VTK support: YES (ver 7.1.0)

Media I/O:
ZLib: build (ver 1.2.8)
JPEG: build (ver 90)
WEBP: build (ver 0.3.1)
PNG: build (ver 1.6.24)
TIFF: build (ver 42 - 4.0.2)
JPEG 2000: build (ver 1.900.1)
OpenEXR: build (ver 1.7.1)
GDAL: NO
GDCM: NO

Video I/O:
Video for Windows: YES
DC1394 1.x: NO
DC1394 2.x: NO
FFMPEG: YES (prebuilt binaries)
codec: YES (ver 57.48.101)
format: YES (ver 57.41.100)
util: YES (ver 55.28.100)
swscale: YES (ver 4.1.100)
resample: NO
gentoo-style: YES
GStreamer:
base: YES (ver 1.0)
video: YES (ver 1.0)
app: YES (ver 1.0)
riff: YES (ver 1.0)
pbutils: YES (ver 1.0)
OpenNI: NO
OpenNI PrimeSensor Modules: NO
OpenNI2: NO
PvAPI: NO
GigEVisionSDK: NO
DirectShow: YES
Media Foundation: NO
XIMEA: NO
Intel PerC: NO

Parallel framework: OpenMP

Other third-party libraries:
Use IPP: 9.0.1 [9.0.1]
at: G:/code/opencv/3rdparty/ippicv/unpack/ippicv_win
Use IPP Async: NO
Use Lapack: NO
Use Eigen: YES (ver 3.2.9)
Use Cuda: YES (ver 8.0)
Use OpenCL: YES
Use OpenVX: NO
Use custom HAL: NO

NVIDIA CUDA
Use CUFFT: YES
Use CUBLAS: YES
USE NVCUVID: NO
NVIDIA GPU arch: 20 30 35 50 60
NVIDIA PTX archs:
Use fast math: NO

OpenCL: <Dynamic loading of OpenCL library>
Include path: G:/code/opencv/3rdparty/include/opencl/1.2
Use AMDFFT: NO
Use AMDBLAS: NO

Python 2:
Interpreter: C:/Python35/python.exe (ver 3.5)

Python 3:
Interpreter: C:/Python35/python.exe (ver 3.5)

Python (for build): C:/Python35/python.exe

Java:
ant: NO
JNI: NO
Java wrappers: NO
Java tests: NO

Matlab: Matlab not found or implicitly disabled

Documentation:
Doxygen: NO
PlantUML: NO

Tests and samples:
Tests: YES
Performance tests: YES
C/C++ Examples: NO

Install path: G:/libs/opencv

cvconfig.h is in: G:/code/opencv/build
-----------------------------------------------------------------

So basically the procedure to get OpenCV working is:
Set the GSTREAMER_DIR path variable to G:/libs/gstreamer/1.0/x86_64:

 
Set the VTK_DIR path variable to G:/libs/vtk/lib/cmake/vtk-7.1
Set the following to true:
WITH_QT
WITH_CUDA
WITH_CUBLAS
WITH_VTK
WITH_OPENGL
WITH_OPENMP

Hit configure, upon setting these variables several new variables should pop up.
Set the following QT variables as needed:

Qt5Concurrent_DIR =  C:/Qt/5.7/msvc2015_64/lib/cmake/Qt5Concurrent
Qt5Core_DIR =  C:/Qt/5.7/msvc2015_64/lib/cmake/Qt5Core
Qt5Gui_DIR =  C:/Qt/5.7/msvc2015_64/lib/cmake/Qt5Gui
Qt5OpenGL_DIR =  C:/Qt/5.7/msvc2015_64/lib/cmake/Qt5OpenGL
Qt5Test_DIR =  C:/Qt/5.7/msvc2015_64/lib/cmake/Qt5Test
Qt5Widgets_DIR =  C:/Qt/5.7/msvc2015_64/lib/cmake/Qt5Widgets

(optional) Set the following extra variables:
CMAKE_INSTALL_PREFIX=G:/libs/opencv


Hit Generate to create the visual studio project.
Open the project and build everything, once everything is built, run the INSTALL project in the CMakeTargets folder.

Building Caffe

At this point we should have OpenCV 3.1 compiled against our desired flavor of Python, CUDA 8.0, and a few other goodies.  We should also have Boost 1.61 with the Python bindings for our desired python version.  To test this, load up python and type:

    import cv2

If this fails, it is likely due to missing dependent DLLs that need to be in your path.  To fix this, just add the following to your path:

G:/libs/vtk/bin
G:/libs/opencv/x64/vc14/bin
${BOOST_LIBRARYDIR}
G:/libs/gstreamer/1.0/x86_64/bin

Now time for setting up Caffe.
Clone my fork of the repo:

Checkout the "merge" branch.

Clone caffe_deps into G:/libs/caffe_deps.
Checkout the VS2015 branch.

Caffe cmake config

Manually add the following:
BOOST_ROOT=G:/libs/boost_1_61_0
Boost from source:
BOOST_LIBRARYDIR=G:/libs/boost_1_61_0/stage/lib
Boost from binary:
BOOST_LIBRARYDIR=G:/libs/boost_1_61_0/lib64-msvc-14.0
Hit configure and cmake should now be asking about Protobuf.

Set the protobuf variables as follows (you may need to tick "Grouped" and "Advanced"):

Hit configure again to get to the next set of variables that you need to set.


Hit configure again, note that for the library file, it is a list with the 'optimized' and 'debug' flag set before each variable.


And again for LevelDB

And for snappy:

For OpenCV set OpenCV_DIR to G:/libs/opencv

CUDNN
Download CUDNN5 from nvidia and extract the contents to G:/libs/cudnn5 so that the folder structure looks like:
G:/libs/cudnn5/bin
G:/libs/cudnn5/include
G:/libs/cudnn5/lib

Set CMake variables as follows:
CUDNN_INCLUDE=G:/libs/cudnn5/include
CUDNN_LIBRARY=G:/libs/cudnn5/lib/x64/cudnn.lib

Hit configure.

Set the BLAS option to Open

Hit configure again.

Set the following variables:
OpenBLAS_INCLUDE_DIR=G:/libs/caffe_deps/openblas/include
OpenBLAS_LIB=G:/libs/caffe_deps/openblas/lib/libopenblas.dll.a

********** IMPORTANT CUDA BUG ************************
CUDA_HOST_COMPILER=C:/Program Files (x86)/Microsoft Visual Studio 14.0/VC/bin/cl.exe

Hit configure, last time if everything is setup correctly.
For me, python automatically was configured: (Screenshot from a failed attempt with python 3.6)

And this is the config summary:

******************* Caffe Configuration Summary *******************
General:
Version : 1.0.0-rc3
Git : rc-1606-gec05d28-dirty
System : Windows
C++ compiler : C:/Program Files (x86)/Microsoft Visual Studio 14.0/VC/bin/x86_amd64/cl.exe
RelWithDebInfo : /MD /Zi /O2 /Ob1 /D NDEBUG /DWIN32 /D_WINDOWS /W3 /GR /EHsc /MP /MP
Release CXX flags : /MD /O2 /Ob2 /D NDEBUG /Oy- /Zo /Oy- /DWIN32 /D_WINDOWS /W3 /GR /EHsc /MP /MP
Debug CXX flags : /D_DEBUG /MDd /Zi /Ob0 /Od /RTC1 /DWIN32 /D_WINDOWS /W3 /GR /EHsc /MP /MP
Build type : Release

BUILD_SHARED_LIBS : ON
BUILD_python : ON
BUILD_matlab :
BUILD_docs :
CPU_ONLY : OFF
USE_OPENCV : ON
USE_LEVELDB : ON
USE_LMDB : ON
ALLOW_LMDB_NOLOCK : OFF

Dependencies:
BLAS : Yes (Open)
Boost : Yes (ver. 1.61)
protobuf : Yes (ver. 2.6.1)
lmdb : Yes (ver. 0.9.14)
LevelDB : Yes (ver. 1.2)
Snappy : Yes (ver. 1.1.1)
OpenCV : Yes (ver. 3.1.0)
CUDA : Yes (ver. 8.0)

NVIDIA CUDA:
Target GPU(s) : Auto
GPU arch(s) : sm_20 sm_21 sm_30 sm_35 sm_50 sm_60
cuDNN : Yes (ver. 5.1.5)

Python:
Interpreter : C:/Python35/python.exe (ver. 3.5.2)
Libraries : optimized C:/Python35/libs/python35.lib debug C:/Python35/libs/python35_d.lib (ver 3.5.2)
NumPy : C:/Python35/lib/site-packages/numpy/core/include (ver 1.11.2rc1)

Install:

Install path : G:/libs/caffe


If everything looks good, hit generate and you should have your visual studio solution.

Open your solution and hit build all.

Friday, February 5, 2016

EagleEye approaches alpha

I've been working on EagleEye a lot recently with quite a few complete revamps.  It's slowly becoming something that's a productivity boost instead of a bug finding adventure.  With it approaching alpha, I wanted to post a video regarding it in hopes to spur up some interest.


The main features of EagleEye are:
  • Easy rapid prototyping and development of new processing nodes via runtime recompilation of source code.
  • Easy saving of collections of processing nodes and settings into a human readable yml format.
  • Permissive license.  I don't care what you do with it, I just hope that you contribute back.
  • Plugin integration with other libraries.  Plugins for gstreamer rtsp server, SLAM, vtk based rendering, QCustomPlot plotting, caffe neural network classification.
  • Builtin profiling with remotery.

Saturday, February 28, 2015

Rapid computer vision development with Runtime Compiled C++

Previously I started a project to build a tool for rapid computer vision algorithm development.  The goal was to build a tool that would cut the fat in process development by giving a user interface to common algorithms and easy control of changing algorithm parameters.  I've decided to revamp this whole system into a program I call EagleEye.  EagleEye is a node based processing framework with a structure somewhat similar to ROS.

Right now this is super early in the development but I wanted to share something I'm really excited about.

I've integrated Runtime Compiled C++ into the framework, so now significant algorithm changes can be made at runtime without having to do a full recompile.  Here's a super early quick demo.


Getting image watch like debugging in Qt Creator

So a big sticking point for me with working on Linux was the lack of Image Watch which is a great extension for viewing OpenCV images in memory.  Without this functionality debugging can be a huge pain.

Luckily there is a reasonable solution that works nearly as well.

By using GDB's python scripting capabilities, we can download the image from the program that we're debugging and display it with OpenCV's python bindings in an OpenCV imshow window.

I really liked the ability to zoom in on a pixel and view the actual numeric value.  Luckily if you compile OpenCV with Qt and OpenGL, that functionality is available.  I'm not sure which one actually gives this functionality, because I just use both anyways.


Anyways on to the process:


Compile OpenCV with Qt, OpenGL and Python2.7 from source.

This creates a cv2.pyd file that contains the correct python bindings that we need.

Check if GDB is built against python 2 or python 3.  If it's built against python 3 we'll have some issues.  Primarily because OpenCV doesn't have great python 3 support yet.  You can do this in gdb by typing:

python print(sys.version_info)

If this says it is Python 3, we'll have to either build a version of gdb that is compiled against Python 2 or use a different gdb.  I ended up downloading gdb and building it from source against python 2 (all I did was set the python option to on with:

./configure --with-python

Alternatively, if you're using cuda-gdb it already is built against Python 2.

Next make sure gdb can load OpenCV's python module, inside gdb type:

python import cv2

If that works correctly, then hopefully you're accessing the correct build of opencv.  If it doesn't work, or it's the wrong version of OpenCV, take the cv2.pyd and cv2.so file that was compiled from source and put it in your gdb data-drectory. (This can be found from within gdb with "show data-directory")

Now to the fun part, dumping a cv::Mat in python and displaying it with cv2.imshow.

A nice little script was started by Asmwarrior which works for previous versions of OpenCV.

I've since updated it to work appropriately.  It isn't finished but I'll update this as I improve it.

***************************** Script Start **********************************

import gdb
import cv2
import sys
import numpy


class PlotterCommand(gdb.Command):
    def __init__(self):
        super(PlotterCommand, self).__init__("plot",
                                             gdb.COMMAND_DATA,
                                             gdb.COMPLETE_SYMBOL)
    def invoke(self, arg, from_tty):
        args = gdb.string_to_argv(arg)
     
     
        # generally, we type "plot someimage" in the GDB commandline
        # where "someimage" is an instance of cv::Mat
        v = gdb.parse_and_eval(args[0])
     
        # the value v is a gdb.Value object of C++
        # code's cv::Mat, we need to translate to
        # a python object under cv2.cv
        image_size =  (v['cols'],v['rows'])
        # print v
        # these two below lines do not work. I don't know why
        # channel = gdb.execute("call "+ args[0] + ".channels()", False, True)
        # channel = v.channels();
        CV_8U =0
        CV_8S =1
        CV_16U=2
        CV_16S=3
        CV_32S=4
        CV_32F=5
        CV_64F=6
        CV_USRTYPE1=7
        CV_CN_MAX = 512
        CV_CN_SHIFT = 3
        CV_MAT_CN_MASK = (CV_CN_MAX - 1) << CV_CN_SHIFT
        flags = v['flags']
        channel = (((flags) & CV_MAT_CN_MASK) >> CV_CN_SHIFT) + 1
        CV_DEPTH_MAX = (1 << CV_CN_SHIFT)
        CV_MAT_DEPTH_MASK = CV_DEPTH_MAX - 1
        depth = (flags) & CV_MAT_DEPTH_MASK
        IPL_DEPTH_SIGN = 0x80000000
        cv_elem_size = (((4<<28)|0x8442211) >> depth*4) & 15
        if (depth == CV_8S or depth == CV_16S or depth == CV_32S):
                mask = IPL_DEPTH_SIGN
        else:
                mask = 0
        ipl_depth = cv_elem_size*8 | mask  

     
        # conver the v['data'] type to "char*" type
        char_type = gdb.lookup_type("char")
        char_pointer_type =char_type.pointer()
        buffer = v['data'].cast(char_pointer_type)
     
        # read bytes from inferior's memory, because
        # we run the opencv-python module in GDB's own process
        # otherwise, we use memory corss processes      
        buf = v['step']['buf']
        bytes = buf[0] * v['rows'] # buf[0] is the step? Not quite sure.
        print('Reading image')
        inferior = gdb.selected_inferior()
        mem = inferior.read_memory(buffer, bytes)
        print('Read successful')
        if(depth == CV_8U):
            print('8bit image')
            img = numpy.frombuffer(mem, count=bytes, dtype=numpy.uint8)
        if(depth == CV_16U):
            print('16bit image')
            img = numpy.frombuffer(mem, count=bytes, dtype=numpy.uint16)
        img = img.reshape((v['rows'], v['cols'], channel))
        print(img.shape)
        # create a window, and show the image

        cv2.imshow("debugger", img)
     
        # the below statement is necessory, otherwise, the Window
        # will hang
        cv2.waitKey(0)
PlotterCommand()

***************************** Script End **********************************

Now we just edit .gdbinit to auto load the python script by adding the following to .gdbinit:

source {path to script}

And now we can view an opencv image in gdb with:

plot {variable name}


Now this isn't quite as nice as what it could be, QtCreator has built in image viewing functionality for QImage's.  Unfortunately I've already spent a good bit of time trying to get that to work, but with no luck.  So for now, I just keep the gdb console open in QtCreator and use this method.

Bugs:

Running into "Gtk-CRITICAL **: IA__gtk_widget_style_get: assertion `GTK_IS_WIDGET (widget)' failed" when trying to display an image.
Execute the following before opening QtCreator:
export LIBOVERLAY_SCROLLBAR=0


Thursday, May 15, 2014

Structured light camera calibration

Hello,

Things have been super crazy with work and finishing my thesis so I've forgotten to update things.  I wanted to get back to my discussion on structured light since I did the intro to that and didn't finish it.  I also want to commit to posting more often so I can showcase the cool work that I've been doing.

So on to camera calibration.....

There are quite a few great tools out there that do camera calibration for you, one example is the GML camera calibration toolbox, which can automatically detect grid corners and solve for an excellent calibration.  But I ran into an interesting issue with this toolkit that made it insufficient for structured light calibration.
When performing laser calibration and motor calibration, it is necessary to calculate an extrinsic transformation between the camera and the calibration pattern.  What I found with GML was that this extrinsic transformation was not stable.  I discovered this when I couldn't calibrate motor motion with extrinsic values extracted using GML.  This manifested itself in large variation in extrinsic parameter displacements for small constant motor displacements.  I then manually selected the checkerboard corners with the MatLab camera calibration toolbox and found much more consistent extrinsic parameters.  My guess is this is due to the optimization routines used in GML.

So with that being said, the right combination of MatLab toolboxes and some custom code can make a completely automated calibration routine.  Today we'll talk about camera calibration.

For just camera calibration, we can use AMCC toolbox.  This is a modification to the MatLab camera calibration toolbox to include automatic checkerboard extraction, which I consider a must since manually selecting checkerboard corners is a huge pain.

First print out a checkerboard pattern and attach it to a rigid flat surface.  I like to use the patterns provided with GML in its install directory since they're pre-made.
Collect images of the pattern with your camera with a consistent naming convention.  I like to call them Left-*.jpg and Right-*.jpg when using a stereo setup, and just Image-*.jpg otherwise.
The images should look similar to this (without the laser for now though)


Place about twenty images in different poses into a folder.  Enter that folder with Matlab and edit auto_mono_calibrator_efficient (provided by AMCC toolbox).
Add / edit these lines at the top of auto_mono_calibrator_efficient.

dX = 18.7452;
dY = 18.7452;
nx_crnrs = 7;
ny_crnrs = 4;
proj_tol = 2.0;
format_image = 'jpg';
calib_name = 'Image-';

Where dX and dY are the measured sizes of the checkerboard squares in mm.  nx_crnrs and ny_crnrs are the number of checkerboard corners along each axis.  format_image is obviously the image format, and calib_name is the base name of the image.

Now run auto_mono_calibrator_efficient and it should spit out the calibration data for this camera.
For a Logitech webcam running at 640x480, I got the following results:

Focal Length:          fc = [ 783.70794   771.22158 ] ± [ 8.81920   9.13420 ]
Principal point:       cc = [ 237.23567   270.25039 ] ± [ 12.64706   6.05165 ]
Skew:             alpha_c = [ 0.00000 ] ± [ 0.00000  ]   => angle of pixel axes = 90.00000 ± 0.00000 degrees
Distortion:            kc = [ -0.06032   0.06316   -0.00330   -0.02552  0.00000 ] ± [ 0.02146   0.06905   0.00272   0.00393  0.00000 ]
Pixel error:          err = [ 0.20168   0.14721 ]

Keep in mind the pixel error values really really should be between 0.1 and 1.  If they aren't then there is something very wrong.
Things that can go wrong include:
1) Blurry / poorly exposed images.
2) Incorrect input number of corners, or incorrect correspondences. (Checkerboard shouldn't be too skewed from the image sensor)
The amcc toolbox is fairly robust, thus it will likely reject bad images and still provide a good result, also since it's automatic, there's no frustration after hand selecting 130 images to find half of them are too blurry or dark. (Special project involving NIR cameras)

Next I'll discuss how to calibrate cameras with OpenCV for those who don't have Matlab.

Monday, March 10, 2014

The start of my flexible computer vision program.

Hello all,

My apologies for not posting for a while, I've been incredibly busy with finishing my thesis.

I wanted to blog about the new computer vision program I've been working on.  This program will hopefully help me develop computer vision algorithms faster and it could be a good teaching tool to demonstrate how computer vision works.

This program is designed to give a flexible interface to OpenCV using QT as a user interface.  My motivation behind this is to create a program that can let me easily create a processing pipeline then modify parameters of that pipeline.
Some key features of this are:

Selecting multiple sources.
Storing a history of all filters applied with settings.
Allows you to create a processing pipeline and then view the results with different input sources.
Save the pipeline to a text file and which can then be loaded by a command line program to execute.

So here's an early example of usage:

Main Window:


Select image source: 


After images are selected:


Once the sources images are loaded, you can create a processing pipeline with different filters.  A temporary image is shown with the current filter settings, as settings are changed you can view in real time the changes made.  Once you are satisfied you can commit the changes to the filter history.
After you've built up some operations, you can then see what the operations look like on other images simply by clicking on a different source image.

This is still the very early stages of development, I've only had two days to work on this so far.  But I'm very excited for how it will make image processing easier for me in the future.
My goal is to add a section for extracting features from a processed image and then perform machine learning on those statistics.  I also plan on adding an image labeling section to make this the go to application for performing learning.


Wednesday, November 27, 2013

Introduction to Structured Light

Good afternoon everyone,

I'm going to try to blog at least one a week about useful projects and things that I've been working on.  Today I'm going to do a high level discussion about how structured light works and how to make your own profilometer.

A profilometer is a device that uses a beam of light and a camera to measure depth.  They can be tuned to work with many different working ranges and resolutions.  Some can measure surfaces to within 0.01mm accuracy.

The range calculation for a profilometer comes from something called triangulation.  Triangulation is the calculation of the parameters of a triangle created between the camera and the laser beam.
A great resource on this topic is the Build Your Own 3D scanner course from Brown University. They have a set of course notes that's nearly a book where I learned quite a bit.

In summary, to create your own profilometer you'll need the following hardware:

1) Camera (I used a Logitech C920)
2) Laser source 
3) Digital servo motor (Can be had for as low as $10 from sparkfun.com)
4) Mounting hardware and a way to control the motor
My setup looks like this:
The kinect is for other uses.

I'm going to assume you can figure out how to mount everything and how to control a digital servo, so on to the fun.
What you'll need to do to make an accurate scanner is the following:
1) Calibrate the camera
2) Calibrate the laser to the camera
3) Calibrate the motion of the camera due to the servo